How to Use the Design Cycle Method? (In 4 Simple Steps)


No matter what the design project is, sometimes a designer needs simple instructions to follow. Something they can lean on. That’s what Design Cycle is for. It provides a clear understanding of which steps to follow. This method is very flexible so it can work for different types of projects.
At Tenscope, we design digital products and always look for the best ways and tools to optimize our design process. In this article, we will talk about a Design Cycle and explain how it works and can benefit your design team. So, get aboard, and let's explore one of the most effective instruments of design.
So, what is the Design Cycle?
If you Google “Design Cycle”, you will see a bunch of colorful illustrations. There are several types of Design Cycles, but they are all quite similar. In general, they consist of four to seven steps – starting with research and finishing with testing the product. The main purpose is to structure the design process and lead the designers from a problem to a solution.
The classical version of this framework is MYP (Middle Years Program). Developed as a framework for international students to solve design problems and apply design thinking, the Cycle made its way from the academic environment into the world of business.
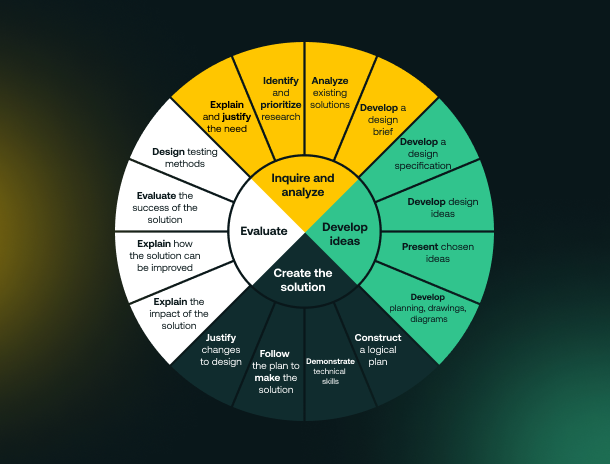
The MYP consists of four main steps, and each step has a few sub steps. Let’s follow this framework and see how this method can help you build a smooth and efficient work process.
Step 1: Inquire and analyze
Research is the first and the most critical step of any design process. You gain important insights about your project at this stage and it shapes your next design decisions.

Explain and justify the need
You need to clearly define the purpose of your project before going any further. Find out which “wicked” problem you aim to solve and how you can do it.
Identify and prioritize research
At this stage, you have a hypothesis and you need to prove it. It happens way too often that product teams take their assumptions as facts. Only once the project is launched, they realize that it was all in their heads. So don’t skip the research. Make sure your potential users need the solution you design. At this point, design teams conduct surveys, interview users, and study the market.
Analyze the existing products
Studying the competitors is a significant part of your research. As a matter of fact, we rarely are the first to try solving one or another problem. So don’t hesitate to learn from those who’ve been therefor a while. Find any product similar to yours, analyze their pros and cons, and look for the aspects of the problem they haven’t covered.
Develop a design brief
The first stage of the Design Cycle is a design brief as a conclusion of your research. A Design brief is basically a plan that you and your team will follow in order to complete the product.
A good design brief should include:
- The problem you aim to solve/your project objectives
- How you plan to solve the problem
- Information about your client and their initial request
- A description of your target audience
- An overview of your competitors/similar solutions
- Timeline and budget of your project
- Specification of the project
Once, a design brief is done you can proceed to the next step.
Step 2: Develop ideas
This is a favorite stage for those who like generating ideas, brainstorming, and working in a team. Here, designers get creative and innovative while developing ideas of how to make the product come true. Let’s go through this one step by step!
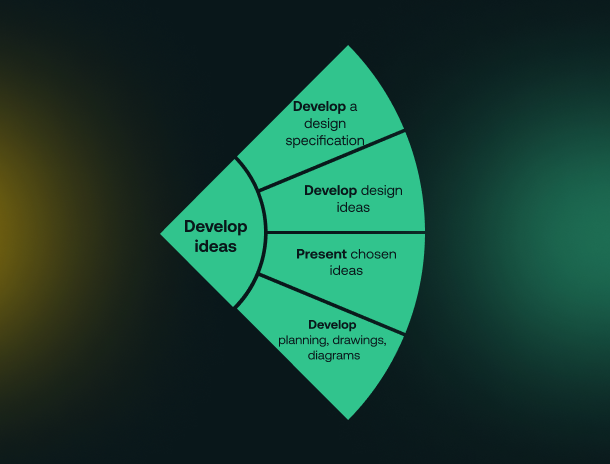
Develop a design specification
You may start with listing your design specifications, so once you get to the idea generation, you have specific requirements. Though some design teams prefer to generate ideas without any restrictions first - and then narrow them down according to the project specifications.
Develop design ideas
There are a lot of ways to generate new ideas. If you want to come up with a solution as a team – brainstorming is a good choice. Not only do you get various ideas, but brainstorming is also good for the team spirit and trust level in a team. It might be useful to have a facilitator so the process doesn't get messy.
If you work on the ideas alone – research the market, analyze the trends, focus on your users’ needs, see which solutions your competitors have, and think about how your version can stand out and be more attractive to users.
Present the chosen ideas
Even if you came up with the ideas on your own, you need to get feedback. At this stage, you can analyze every idea with your team or potential users and choose the one that fits your project best. We recommend keeping records of all the ideas – you might go back to them in case you need to find alternative solutions.
Develop planning, drawings, and diagrams
That’s the moment to visualize your idea through various drawings, diagrams, and storyboards. You can design user flows, capture user personas, and create user journeys that you will rely on when creating the UX/UI design of your product.
These visualizations based on your previous work will make a base for the next stage.
Step 3: Create the solution
And… here we are! At this stage, you get a prototype of your product, which means you’ll finally get a first look at how it works (and at what doesn't work too).

Construct a logical plan
It might sound boring, but a good and detailed plan is half of the work. Once you start producing something, everyone on the team must know what they need to do and when they need to do it.
Here are some good questions to help you make an efficient plan:
- Which steps do we take to create a prototype?
- Which task every team member is responsible for?
- What are the deadlines?
- How are we going to measure the results?
- How and when will we test the prototype?
Demonstrate technical skills
Your first prototype doesn't have to look beautiful, but it must demonstrate the features. It should give potential users a possibility to test if it actually helps solve the problem. Don't try too hard to polish it. The prototype has to be functional. As a rule, the prototype will be changed and modified a lot before you get a working solution.
Follow the plan to make the solution
Your team has a detailed plan that you've created before. So rely on your previous work, look at the user personas and flows you designed, and build your design decisions based on them. Though, if along the process you realize that you need to change the plan – feel free to adjust to the new factors.
Justify changes to the design
At the stage of creating the prototype, you may already have changes to the design you initially planned. You get the first look and feel of the product you create and the first feedback too! It is completely normal to see that something does not work. It is important that you, your team, and your client stay flexible and analyze how the prototype performs.
And to track the performance it’s crucial to evaluate the product of your design process.
Step 4: Evaluate
It's time to analyze and evaluate the work you've done.
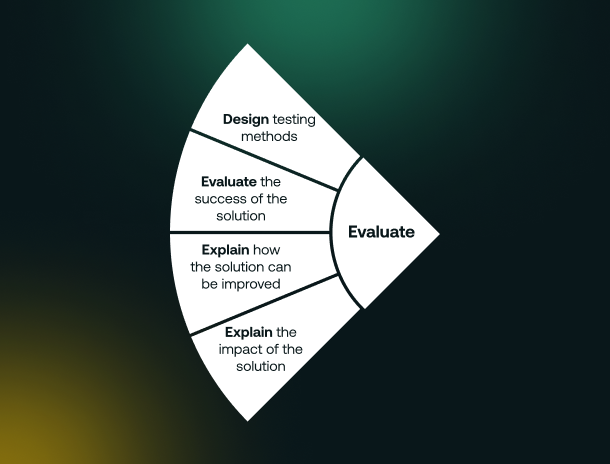
Design testing methods
Each design project needs a specific testing approach to achieve the best results. You can rely on A/B tests offering users two versions of your design to see what performs better, run surveys to hear users' opinions about your design, or test your product as MVP in the open market. Collect as much feedback as possible to see how the product you designed performs with real users.
Evaluate the success of the solution
Based on the testing, you have to see how users interact with your design and if it solves the problem. Remember why you've started the whole thing. It's good if you have specific metrics to measure the success of your solution.
Explain how the solution can be improved
Analyzing the testing results and metrics, see how you can make the design better fit its purpose. Remember, there is always room for improvement. Write down an action plan for further improvements and implement them in the next iterations of your design process.
Explain the impact of the solution
It's time to get back to the very beginning and look at the reason you've started the project. How does your result cover the initial problem? Which impact does your product make?
Basically, the whole last step is about analyzing and reflecting, asking questions, and answering them. It is step four, but it doesn't mean it is the last one. It's completely possible that at this point, you realize that you need to go back and replay some of the stages. Do some more research. Add some new features. Abandon some of your initial ideas that you now realize do not work well enough.
Remember that it is a natural process indesign – going over and over, looking for a better solution. However, remember that the changes shouldn’t be based only on your perfectionism, they should rely on research and results of testing the prototypes.
Documentation is your safety net
The important and often underestimated aspect of the Design Cycle is documentation. The process has many steps, as you can see. It is crucial to keep records and document not only the chosen solutions but all the thoughts and ideas that you get along the way.
If the solution you've chosen doesn't work, you can always come back to your notes and refresh your memory or try an alternative path. Documentation and notes also make it much easier to onboard team members and own the design that the team has created.
Many people are scared of the word “documentation” itself since it reminds them of all the bureaucracy, but let's be real – in a modern world with all those digital services, it cannot be that hard.
What are the benefits of using the Design Cycle model?
One of the most useful things is that it helps you avoid many mistakes. The process is built in such away that requires you to look back from time to time and reflect on your actions.
You also can see a direct connection between the initial request and the result. It is harder to get lost in the project since you have a clear pathway.
One of the biggest benefits of the Design Cycle is that the method is extremely flexible. You can customize the Cycle for your needs, skip some of the sub steps, or add extra ones depending on your goals.
Also, you can keep using the tool when the project is ready. This way, it is a very universal method that helps you improve the design again and again.
Summary
In general, any product design process is a cycle: designers come up with an idea, research, develop solutions, choose the proper one, create a product, test, and launch it. Product teams go over again and again: make more research, design new features, make constant improvements, test, and launch. Design is a living process. Sometimes the result has nothing to do with what was first imagined. Product designs often change over time – based on more research, new possibilities, and new solutions.
For such a vibrant and creative process, Design Cycle is a great practical tool –a simple scheme that helps to get from a design concept to a ready product.
Tenscope UX professionals successfully apply the method of the Design Cycle to create outstanding digital solutions. Get in touch if you want to empower your product team with a skillful product designer! Perhaps, you know the feeling when you are full of ideas but don’t know where to start and how to make them work. Or when you start creating a design, you may get lost along the way and you can’t see where you've turned in the wrong direction.